RocketLauncher Clean Install
Contents
- 1 Demostration Videos
- 2 How to do a Clean Install
- 3 How to Update an Install from HyperLaunch 2.x
- 3.1 Step 1 - HyperSpin.exe
- 3.2 Step 2 - HyperLaunch & HyperLaunchHQ: Download your favorite Front End companion!!
- 3.3 Step 3 - Connect HyperLaunch & HyperSpin: Point HyperSpin to HyperLaunch directory
- 3.4 Step 4 - Cleaning up your Hyperspin inis
- 3.5 Step 5 - Old Modules
- 3.6 Step 6 - System Names with Manufacturer tags
- 3.7 Step 7 - Emulator Folder Names
- 3.8 Step 8 - Install the font for HyperPause
- 3.9 Step 9 - Move your <exe> tags in your xmls to Games.ini
- 3.10 Step 10 - Additional Utilities
Demostration Videos
If this is your first time with Hyperlaunch 3 and you want to understand more about what this is all about, please set aside some time to watch those videos which go over all of HyperLaunch 3's features and file and folder structures so you can familiarize yourself with where everything needs to be placed.
How to do a Clean Install
Grab the files
Grab the latest HyperSpin installation package from the HyperSpin Download section and extract it to the root of your desired drive, eg. C:\Hyperspin
Understanding how the ini system works
All these files are found in your HyperLaunch\Settings\ folder.
HyperLaunch.ini: This file contains settings not specific to a single system. It would contain keys, paths, settings, etc that you wouldn't change on a per-system basis for whatever reason
Global HyperLaunch.ini: This file contains the same keys found in the system's HyperLaunch.ini, but will have the default settings that affect every system. If you want to turn on and configure a feature on every system without having to touch all the HyperLaunch inis, this is where you do it.
Global HyperPause.ini: This file contains the same keys found in the system's HyperPause.ini, but will have the default settings that affect every system. If you want to turn on and configure a feature on every system without having to touch all the HyperPause inis, this is where you do it. See the HyperPause section for more information.
Global Emulators.ini: This file is where you want to define most, if not all your emulators. Each section in this ini will have an emulator name which is how the system links to the emulator you want to use. The emulators defined in this ini can be used for any system in your Frontend.
SystemName\HyperLaunch.ini: This file contains the same keys found in Global HyperLaunch.ini but is specific for the system. Default values for all the keys are use_global. If you change the value, it will only affect this system.
SystemName\HyperPause.ini: This file contains the same keys found in Global HyperPause.ini but is specific for the system. Default values for all the keys are use_global. If you change the value, it will only affect this system. See the HyperPause section for more information.
SystemName\Emulators.ini: This file contains your [ROMS] section with the Rom_Path and Default_Emulator keys. It can also contain Emulator sections if you want to define an emulator specific to just this system.
SystemName\Games.ini: This file is the replacement for the old <exe> attributes and how games can be mapped to use different emulators from the default one defined for this system.
On your first launch of any new system, HyperLaunch will create all the default inis it needs for that system.
How to Update an Install from HyperLaunch 2.x
HyperLaunch 3 is not just an update but rather an upgrade. You will be completely changing everything about HyperLaunch. Follow these steps and you will be on your way getting it installed.
Remove these files & folders from your HyperSpin root directory and back them up in a safe place until after your upgrade is verified working:
Keymapper Profiles\* Modules\ Settings\Global Settings.ini** 7z.dll 7z.exe AutoHotkey.dll HyperSpin.exe HyperLaunch.exe HyperLaunch.log
- This folder does not exist anymore but refer to the keymapper section for the correct placement of your profiles for use with HyperLaunch 3.
- Only remove this file, not the folder.
Step 1 - HyperSpin.exe
Download the latest version of HyperSpin from HERE and replace your existing HyperSpin.exe. This is required for HyperLaunch 3 to function.
Step 2 - HyperLaunch & HyperLaunchHQ: Download your favorite Front End companion!!
Download HyperLaunch and HyperLaunchHQ folders and contents from GIT, fallow the Download page instructions, also download the HyperLaunch Media from HERE. These can be located anywhere on your computer but it is recommended that they get placed in your HyperSpin Folder to make them simple to find when you need them, plus it will also make it easier to configure some parts of HyperLaunch.
Step 3 - Connect HyperLaunch & HyperSpin: Point HyperSpin to HyperLaunch directory
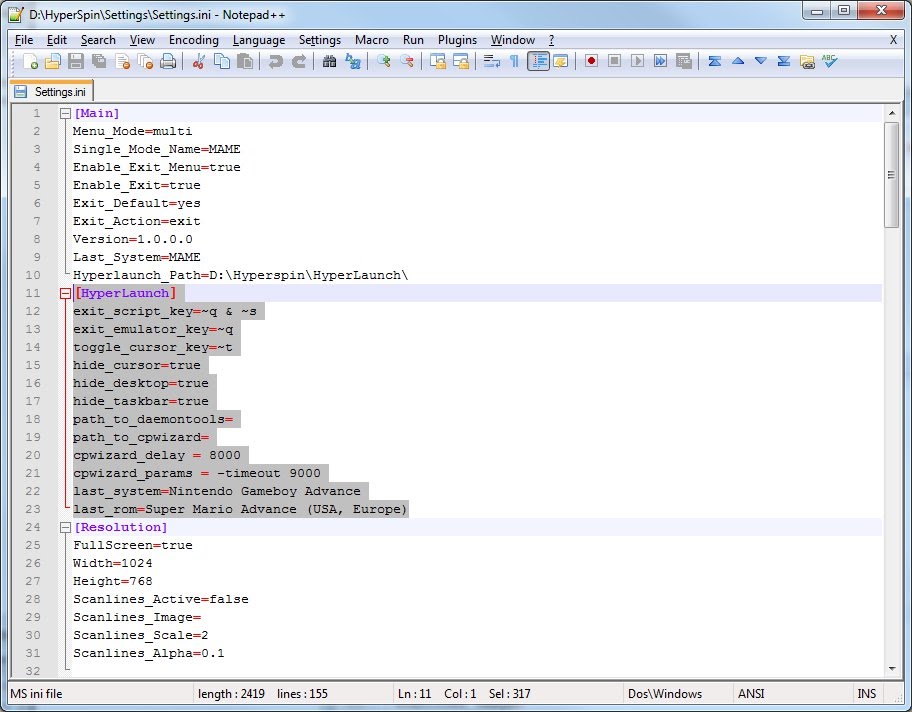
Open your Settings.ini in your Hyperspin\Settings folder. Add the following line to the bottom of the [Main] Section:
Hyperlaunch_Path=D:\Hyperspin\HyperLaunch\
Make sure your Path matches your HyperLaunch path on your computer, the path above is an example.
While you have the Settings.ini open, you can delete the entire [HyperLaunch] section.
Step 4 - Cleaning up your Hyperspin inis
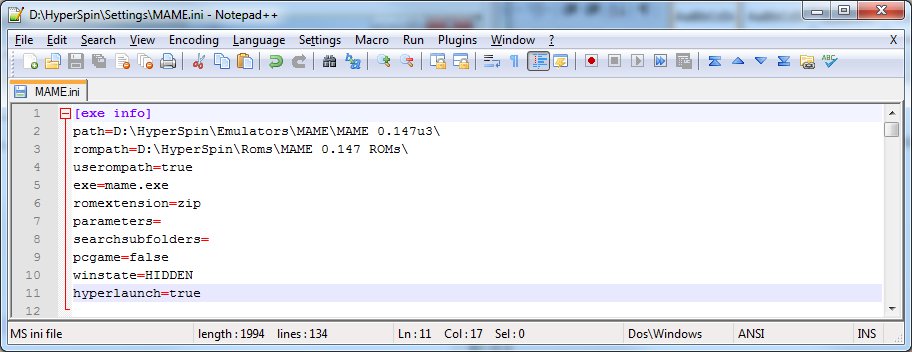
In each of your %System Name%.ini files in the same folder (eg. MAME.ini), you should delete ALL settings that have to do with HyperLaunch 2. The only settings left in the [exe info] section should be:
[exe info] path= rompath= userompath= exe= romextension= parameters= searchsubfolders= pcgame=false winstate=hidden hyperlaunch=true
They should all be blanked out to avoid confusion like you see above. It is important hyperLaunch key is true and pcgame is false.
The following highlighted lines from are an example of ones that should be deleted, but you may have more:
Now your [EXE] section should like something like this:
Step 5 - Old Modules
If you didn't already, delete your Modules folder located in your Hyperspin root Directory. These modules have been moved to the HyperLaunch folder and have been completely rewritten to accommodate the new features of HyperLaunch so these Modules are no longer required. If you know you set any settings inside your modules, you can keep those for now in case you need to reference those settings to apply to in HyperLaunchHQ later.
Step 6 - System Names with Manufacturer tags
HyperLaunch 3 does not support the loose system name structure. For example, Nintendo shall be named Nintendo Entertainment System. Gamecube shall be called Nintendo GameCube, etc. An easy way to tell if your system is named correctly is if the icon appears next to your system name and your main menu wheel image shows at the bottom in HyperLaunchHQ. You can always check your icon folder to see if the system name is supported.
Another method is to ensure all your Systems in Hyperspin match exactly to the System Names listed in HyperList on the Hyperspin forums http://hyperlist.hyperspin-fe.com/. As an example, the Game Boy should be named “Nintendo Game Boy”, not “Nintendo GameBoy” (note the lack of a space), or “Game Boy”. This will make your configuration and running of HyperLaunch much smoother and the new modules will work across the board.
From now on, whenever you create a new System via Main Menu Wizard in HyperHQ, make sure the new name you enter matches HyperList exactly.
Be sure to check these locations and update them to match the correct system name. Places you need to update are marked as "SYSTEMNAME":
- Hyperspin\Databases\SYSTEMNAME\SYSTEMNAME.xml
- Hyperspin\Databases\Main Menu\Main Menu.xml (open the file an editor and update the system name in there)
- Hyperspin\Media\SYSTEMNAME\
- Hyperspin\Media\Main Menu\Images\Wheel\SYSTEMNAME.png
- Hyperspin\Media\Main Menu\Themes\SYSTEMNAME.zip
- Hyperspin\Media\Main Menu\Video\SYSTEMNAME.mp4
- Hyperspin\Settings\SYSTEMNAME.ini
Step 7 - Emulator Folder Names
This step isn’t mandatory, but again, it will make your setup and maintenance of HyperLaunch much smoother in the long run. It is recommended to keep all your Emulators under the one folder, with sub folders for each revision of an emulator in it’s own folder.
eg. D:\HyperSpin\Emulators\MAME\MAME 0.148\
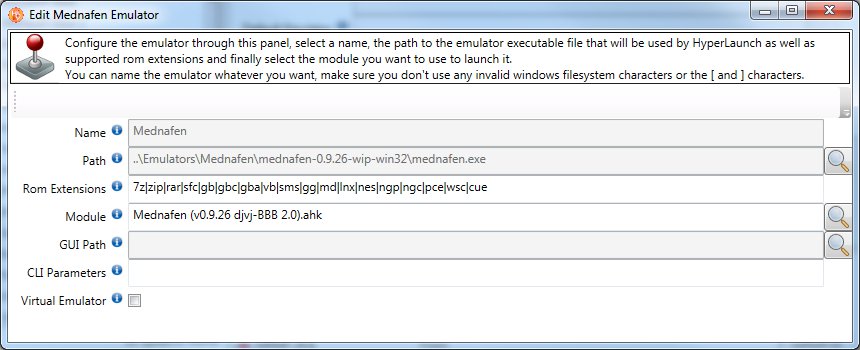
If you want a really simplified install of HyperLaunch, you can go to the Emulators tab in HyperLaunchHQ and look at the Path entries for each emulator you want to use and make your paths match that of the ini file. If you decide to keep your own folder structure for emulators you can, you can follow the HyperLaunchHQ guide to see how to set up your emulator paths to work with HyperSpin.
You can see in the picture above that the Path contains ..\ at the start of the Path. This indicates that the folder is a "relative path" and in the Hyperspin root directory,
eg. D:\Hyperspin\Emulators\Mednafen\mednafen-0.9.26-wip-win32\medanfen.exe
This method gives HyperLaunch and the emulators great portability. If you decide to move your HyperSpin setup to another drive, you won’t need to reconfigure HyperLaunch to match the paths of the emulators on the new drive you move it to.
Now that you have set up the base for your new HyperLaunch install, you can follow the HyperLaunchHQ guide to learn how to configure HyperLaunch with all the new features!
Step 8 - Install the font for HyperPause
HyperPause uses the default font BebasNeue.ttf. You can find this on dropbox or on your folder after you download all the files in HyperLaunch\Media\Fonts
Right click this file and select Install. You can now see all the text in HyperPause.
Step 9 - Move your <exe> tags in your xmls to Games.ini
HyperLaunch does not use those exe tags, and they need to be transitioned out of your xmls and into HyperLaunch's games.ini files found in your System settings folders. See the Alternate Emu Mapping page on how to create a games.ini for each of your systems and assign games into it.
After this is done for each system, Delete all the <exe> tags in the database. You can do this by using find/replace or by just re-downloading the xml again from HyperList as HyperList does not store these tags.
Step 10 - Additional Utilities
HyperLaunchHQ makes use of various programs such as Xpadder, JoyToKey, VJoy, and more. It is highly recommended to create folders for these in Hyperspin\Utilities\ if you have not already done so.
Recommended: DAEMON Tool Lite, Notepad++, Xpadder, JoyToKey, and VJoy.


