Difference between revisions of "Development"
Jump to navigation
Jump to search
Kevinlives (talk | contribs) (Created page with "'''Development'''") |
|||
| (13 intermediate revisions by 2 users not shown) | |||
| Line 1: | Line 1: | ||
| − | ''' | + | =User Customized Modules= |
| + | #One thing to take note is that with the convenience of this update system, comes a price for those who prefer to edit modules. | ||
| + | #If you really must edit an official module, you will need to make a copy of it (and the ISD/INI if they exist) and edit the copy. | ||
| + | #Open the copy in notepad++ and remove the MCRC, iCRC, and MID lines: | ||
| + | #::[[Image:editedmodule.png|link=]] | ||
| + | #If you do not do this, RocketLauncherUI will give you these errors: | ||
| + | #::[[Image:dupemoduleerrors.png|link=]] | ||
| + | #After removing those lines, it should look like this after you refresh the listing: | ||
| + | #::[[Image:nodupeerrors.png|link=]] | ||
| + | #Now you have 2 choices, you can assign your custom module to its own emulator so you can easily go back and forth between your custom module and the official one if some changes to it come later. Your other choice is to change the existing emulator's mapping to your custom module which will cause all systems/games that use the official module to now use your custom one instead. | ||
| + | #Select one of the solutions below. | ||
| + | |||
| + | ==Creating A New Emulator For Your Module== | ||
| + | If you decide to go the route of creating a new emulator for your custom module, follow these instructions: | ||
| + | #First, you need to assign an emulator to your module, so for most scenarios you will want to make a global emulator. Select the Global System and the [[Image:addnewemulatorbutton.png|link=]] button to add a new emulator: | ||
| + | #::[[Image:selectglobalsystem.png|link=]] | ||
| + | #Set all the appropriate settings for your new emulator, you can copy the existing ones from the existing emulator for this module as well: | ||
| + | #::[[Image:newglobalemulator.png|thumb|none]] | ||
| + | #Now if you want to immediately use your custom module, follow these steps to make it your default emulator for your system: | ||
| + | ##Select the system you want to change | ||
| + | ##Select Emulators tab | ||
| + | ##Click the magnifying glass to popup the Emulator Selection window | ||
| + | ##Select your new custom module | ||
| + | #::[[Image:selectnewdefaultemu.png|thumb|none]] | ||
| + | #*If for some reason your module is not shown, try going to the Modules tab and clicking the refresh button [[Image:refreshbutton.png|link=]] and try again | ||
| + | #Enjoy your new custom module! | ||
| + | |||
| + | ==Remap Existing Emulator For Your Module== | ||
| + | If you decide to go the route of simply remapping the existing emulator to your custom module, follow these instructions: | ||
| + | #Your only step is to edit the existing module and point it to your new module. First, you need to assign an emulator to your module, so for most scenarios you will want to make a global emulator. Select the Global System and Emulators Tab: | ||
| + | #::[[Image:selectglobalsystem.png|link=]] | ||
| + | #Now find the emulator that matches your module and double click it and change the Module setting to the path of your custom module: | ||
| + | #::[[Image:remappedemulator.png|thumb|none]] | ||
| + | #Now any system that already had this emulator assigned to it, will now be using your new custom module! | ||
| + | |||
| + | =Creating Your Own Functions= | ||
| + | *'''You can add your own functions and code to affect every module''' | ||
| + | *You have 2 functions in your \Lib folder called '''User Functions Init.ahk''' and '''User Functions.ahk''' | ||
| + | |||
| + | ==Lib\User Functions\Global.ahk== | ||
| + | ===InitUserFeatures()=== | ||
| + | ; Use this function to define any code you want to run on initialization | ||
| + | InitUserFeatures() { | ||
| + | Global RLLog,dbName,systemName | ||
| + | RLLog.Info(A_ThisFunc . " - Starting") | ||
| + | ; PASTE YOUR User Functions Init.ahk HERE | ||
| + | RLLog.Info(A_ThisFunc . " - Ending") | ||
| + | } | ||
| + | |||
| + | *This should contain any code you want to "Run" with the modules. This is where you place code you might need to setup or initialize something you want to run later. Take a look at and of the other Init ahks to see how these files are used. | ||
| + | *'''DO NOT''' place any Functions or Labels in this file, it will lock up the thread and give the appearance it froze when it's actually stuck in your function not knowing what to do. | ||
| + | *This file will "Run" before StartModule() found in each module. For example, if you place this script in this file: "MsgBox test", it will show a msgbox on launch of every emulator. | ||
| + | *So you can see why it's important you place only script you feel is required for every module. | ||
| + | |||
| + | ===StartUserFeatures()=== | ||
| + | ; Use this function to define any code you want to run in every module on start | ||
| + | StartUserFeatures() { | ||
| + | Global RLLog,dbName,systemName | ||
| + | RLLog.Info(A_ThisFunc . " - Starting") | ||
| + | ; INSERT CODE HERE | ||
| + | RLLog.Info(A_ThisFunc . " - Ending") | ||
| + | } | ||
| + | *Place any ahk code in the space provided and it will be launched at the beginning of every module, before the emulator runs. | ||
| + | *This should contain any Functions and Labels that are called within the module itself. Take a look at and of the other non-Init ahks to see how these files are used. | ||
| + | *If you create a function that looks like this: | ||
| + | MyFunc(text){ | ||
| + | MsgBox % text | ||
| + | } | ||
| + | *Then in the module place this line anywhere you want: "MyFunc("Hello World")", it will show you the msgbox at that specific spot. | ||
| + | |||
| + | ===StopUserFeatures()=== | ||
| + | ; Use this function to define any code you may need to stop or clean up in every module on exit | ||
| + | StopUserFeatures() { | ||
| + | Global RLLog,dbName,systemName | ||
| + | RLLog.Info(A_ThisFunc . " - Starting") | ||
| + | ; INSERT CODE HERE | ||
| + | RLLog.Info(A_ThisFunc . " - Ending") | ||
| + | } | ||
| + | |||
| + | *Place any ahk code in the space provided and it will be launched at the end of every module, after the emulator is closed, but before the module thread exits. | ||
| + | |||
| + | ===StartPauseUserFeatures()=== | ||
| + | *This function has already been created for you in Lib\User Functions.ahk. | ||
| + | *Place any ahk code in the space provided and it will be launched when Pause is activated. | ||
| + | |||
| + | ===StopPauseUserFeatures()=== | ||
| + | <br /> | ||
| + | *This function has already been created for you in Lib\User Functions.ahk. | ||
| + | *Place any ahk code in the space provided and it will be launched Pause is exited. | ||
| + | |||
| + | ===Don't Repeat Yourself=== | ||
| + | *A very good rule of thumb to follow is something called DRY: http://en.wikipedia.org/wiki/Don't_repeat_yourself | ||
| + | *When you create your own code, and you need to go back and change something, if you did not follow the above principles, you might not remember to change all instances of something. | ||
| + | ---- | ||
| + | ==RocketLauncher.dll== | ||
| + | This dll provides some critical functions to get many of the features working. To utilize it, we have to first create a com object, then pass that along with what we want the dll to do. | ||
| + | <br> | ||
| + | <br> | ||
| + | <u>First include these libraries in your script:</u> | ||
| + | #Include, CLR.ahk | ||
| + | #Include, COM.ahk | ||
| + | <br> | ||
| + | <u>Create the object:</u> | ||
| + | DLLLibrary := CLR_LoadLibrary("PATH_TO_DLL") | ||
| + | TestObject := CLR_CreateObject(DLLLibrary,"RLUtil.RocketLauncherUtils") | ||
| + | Now you can use the object to start calling functions from the DLL. | ||
| + | <br /> | ||
| + | <br /> | ||
| + | The following functions are supported by the DLL. For an up-to-date listing, always check '''Lib\RL.ahk''' | ||
| + | <br /> | ||
| + | |||
| + | ===checkModuleCRC=== | ||
| + | :<u>Purpose</u>: Provides a method to calculate the CRC of a module, extension, and library, which RocketLauncher uses to determine if these files are official or not. | ||
| + | :<u>Usage</u>: | ||
| + | ::Module CRC Checking: | ||
| + | ::<pre style="color: green">Result := COM_Invoke(TestObject, "checkModuleCRC", "PATH_TO_MODULE_AHK_FILE","",1)</pre> | ||
| + | ::Ahk Library CRC Checking (CLR,Gdip,etc.): | ||
| + | ::<pre style="color: green">Result := COM_Invoke(TestObject, "checkModuleCRC", "PATH_TO_AHK_FILE","CRC_VALUE",0)</pre> | ||
| + | ::RocketLauncher Extensions (Pause,FadeAnimations,etc.): | ||
| + | ::<pre style="color: green">Result := COM_Invoke(TestObject, "checkModuleCRC", "PATH_TO_AHK_FILE","",0)</pre> | ||
| + | |||
| + | ===set7zdllPath=== | ||
| + | :<u>Purpose</u>:Provides a way to change the path to the 7z.dll. By default it will use the 7z.dll file that's in the same folder as the dll. | ||
| + | :<u>Usage</u>: | ||
| + | ::<pre style="color: green">Result := COM_Invoke(TestObject, "set7zdllPath", "PATH_TO_7Z.DLL_FILE)</pre> | ||
| + | |||
| + | ===findFileInZip=== | ||
| + | :<u>Purpose</u>: Provides a method to find a specific file inside a supported archive. Returns empty string if no matches are found. FILENAMES_TO_SEARCH and EXTENSIONS_TO_SEARCH support multiple entries, separator is the | character, | ||
| + | :<u>Example</u>: filename1|filename2|filename3 or ext1|ext2|ext3. File Extensions are WITHOUT the dot character. | ||
| + | :<u>Usage</u>: | ||
| + | ::<pre style="color: green">Result := COM_Invoke(TestObject, "findFileInZip", "PATH_TO_FILE","FILENAMES_TO_SEARCH","EXTENSIONS_TO_SEARCH")</pre> | ||
| + | |||
| + | ===findByExtension=== | ||
| + | :<u>Purpose</u>: Returns the first found file inside a supported archive when only supplying an extension. Returns empty string if no matches are found. EXTENSIONS_TO_SEARCH support multiple entries, separator is the | character, example: ext1|ext2|ext3. File Extensions are WITHOUT the dot character. | ||
| + | :<u>Usage</u>: | ||
| + | ::<pre style="color: green">Result := COM_Invoke(TestObject,"findByExtension","PATH_TO_FILE","EXTENSIONS_TO_SEARCH")</pre> | ||
| + | |||
| + | ===getZipExtractedSize=== | ||
| + | :<u>Purpose</u>: Returns the uncompressed size, or size on disk, of all files an archive will use when extracted. | ||
| + | :<u>Usage</u>: | ||
| + | ::<pre style="color: green">Result := COM_Invoke(TestObject, "getZipExtractedSize", "PATH_TO_FILE")</pre> | ||
| + | |||
| + | ===getExtractionSize=== | ||
| + | :<u>Purpose</u>: Returns a | separated string of the current file being extracted and current size on disk. Used as a method to determine extraction progress. search_mode can be 0 (Accurate) or 1 (Fast). Only use the Fast Method when you are expecting a folder with hundreds of small files inside it otherwise always use the accurate one. | ||
| + | :<u>Usage</u>: | ||
| + | ::<pre style="color: green">Result := COM_Invoke(TestObject, "getExtractionSize", "PATH_TO_FILE", search_mode)</pre> | ||
| + | |||
| + | ===getExtractionProgress=== | ||
| + | :<u>Purpose</u>: Returns a | separated string of the current file being extracted and a percentage for the global extraction. total_size is the uncompressed size, or size on disk, of the archive, you can get that value using the getZipExtractedSize function. Used as a method to determine extraction progress. search_mode can be 0 (Accurate) or 1 (Fast). Only use the Fast Method when you are expecting a folder with hundreds of small files inside it otherwise always use the accurate one. | ||
| + | :<u>Usage</u>: | ||
| + | ::<pre style="color: green">Result := COM_Invoke(TestObject, "getExtractionProgress", "PATH_TO_FILE", total_size, search_mode)</pre> | ||
| + | |||
| + | ===getFolderSize=== | ||
| + | :<u>Purpose</u>: Returns the size of the specified folder and all it's contents including sub-folders. search_mode can be 0 (Accurate) or 1 (Fast). Only use the Fast Method when you are expecting a folder with hundreds of small files inside it otherwise always use the accurate one. | ||
| + | :<u>Usage</u>: | ||
| + | ::<pre style="color: green">Result := COM_Invoke(TestObject, "getFolderSize", "PATH_TO_FILE", search_mode)</pre> | ||
| + | |||
| + | ===getLongestPathSize=== | ||
| + | :<u>Purpose</u>: Returns the length of the path for deepest file inside the archive. This can be used to check if extracting an archive won't break the 255 character limit that exists in Windows. | ||
| + | :<u>Usage</u>: | ||
| + | ::<pre style="color: green">Result := COM_Invoke(TestObject, "getLongestPathSize", "PATH_TO_FILE")</pre> | ||
| + | |||
| + | ===getZipFileList=== | ||
| + | :<u>Purpose</u>: Returns a | separated string of all files inside a supported archive. Also returns the compression method for each file. Output format is "filename 1|compression type/filename 2|compression type/..." This can be useful for example to debug situations while the progress bar stays at 0% for a while due to the compression method used. | ||
| + | :<u>Usage</u>: | ||
| + | ::<pre style="color: green">Result := COM_Invoke(TestObject, "getZipFileList", "PATH_TO_FILE")</pre> | ||
| + | |||
| + | ===getZipFileCount=== | ||
| + | :<u>Purpose</u>: Returns the number of files inside the archive. | ||
| + | :<u>Usage</u>: | ||
| + | ::<pre style="color: green">Result := COM_Invoke(TestObject, "getZipFileCount", "PATH_TO_FILE")</pre> | ||
| + | |||
| + | ===checkInvalidCharacters=== | ||
| + | :<u>Purpose</u>: Check if compressed files contain illegal filename characters which wouldn't allow it to be uncompressed under Windows (need this for WinUAE as some invalid Windows characters are actually valid AmigaDOS filenames). Returns 1 - Has invalid chars; 0 - No invalid chars. | ||
| + | :<u>Usage</u>: | ||
| + | ::<pre style="color: green">Result := COM_Invoke(TestObject, "checkInvalidCharacters", "PATH_TO_FILE")</pre> | ||
| + | |||
| + | ===getConnectedJoysticks=== | ||
| + | :<u>Purpose</u>: Returns a binary string with 16 characters representing the 16 possible joystick ports windows supports. Example 1100000000000000. A 1 represents a joystick is in that port, 0 means no joystick. You read the binary from left to right with left most number being port 0 and right most port being port 15 (16 ports in total). | ||
| + | :<u>Usage</u>: | ||
| + | ::<pre style="color: green">Result := COM_Invoke(TestObject, "getConnectedJoysticks")</pre> | ||
| + | |||
| + | ===getPdfPageCount=== | ||
| + | :<u>Purpose</u>: Returns the number of pages of a PDF file. | ||
| + | :<u>Usage</u>: | ||
| + | ::<pre style="color: green">Result := COM_Invoke(TestObject, "getPdfPageCount", "PATH_TO_PDF_FILE")</pre> | ||
| + | |||
| + | ===generatePngFromPdf=== | ||
| + | :<u>Purpose</u>: Converts a PDF file to several PNG files (one per page). firstPage and lastPage are optional and if not provided it will convert the whole PDF file. PNG files will be generated to OUTPUT_FOLDER and will be named pageX.png where X is the page number. | ||
| + | :<u>Usage</u>: | ||
| + | ::<pre style="color: green">Result := COM_Invoke(TestObject, "generatePngFromPdf", "PATH_TO_PDF_FILE", "OUTPUT_FOLDER", dpiResolution, [firstPage], [lastPage])</pre> | ||
| + | |||
| + | ===setLogMode=== | ||
| + | :<u>Purpose</u>: Activates logging in the DLL. logMode can be 0 - Log disabled; 1 - Log to file; 2 - Log to memory. When logging to file the output will be directed to RocketLauncher.dll.log that resides in the same folder as the RocketLauncher.dll file. | ||
| + | :<u>Usage</u>: | ||
| + | ::<pre style="color: green">Result := COM_Invoke(TestObject, "setLogMode", logMode)</pre> | ||
Latest revision as of 21:59, 9 November 2016
Contents
- 1 User Customized Modules
- 2 Creating Your Own Functions
- 2.1 Lib\User Functions\Global.ahk
- 2.2 RocketLauncher.dll
- 2.2.1 checkModuleCRC
- 2.2.2 set7zdllPath
- 2.2.3 findFileInZip
- 2.2.4 findByExtension
- 2.2.5 getZipExtractedSize
- 2.2.6 getExtractionSize
- 2.2.7 getExtractionProgress
- 2.2.8 getFolderSize
- 2.2.9 getLongestPathSize
- 2.2.10 getZipFileList
- 2.2.11 getZipFileCount
- 2.2.12 checkInvalidCharacters
- 2.2.13 getConnectedJoysticks
- 2.2.14 getPdfPageCount
- 2.2.15 generatePngFromPdf
- 2.2.16 setLogMode
User Customized Modules
- One thing to take note is that with the convenience of this update system, comes a price for those who prefer to edit modules.
- If you really must edit an official module, you will need to make a copy of it (and the ISD/INI if they exist) and edit the copy.
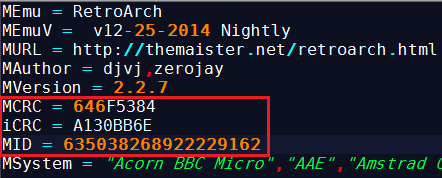
- Open the copy in notepad++ and remove the MCRC, iCRC, and MID lines:
- If you do not do this, RocketLauncherUI will give you these errors:
- After removing those lines, it should look like this after you refresh the listing:
- Now you have 2 choices, you can assign your custom module to its own emulator so you can easily go back and forth between your custom module and the official one if some changes to it come later. Your other choice is to change the existing emulator's mapping to your custom module which will cause all systems/games that use the official module to now use your custom one instead.
- Select one of the solutions below.
Creating A New Emulator For Your Module
If you decide to go the route of creating a new emulator for your custom module, follow these instructions:
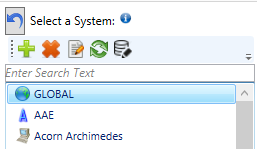
- First, you need to assign an emulator to your module, so for most scenarios you will want to make a global emulator. Select the Global System and the
 button to add a new emulator:
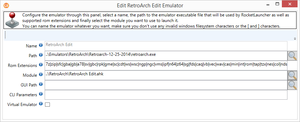
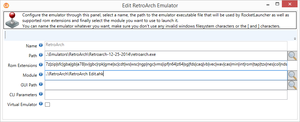
- Set all the appropriate settings for your new emulator, you can copy the existing ones from the existing emulator for this module as well:
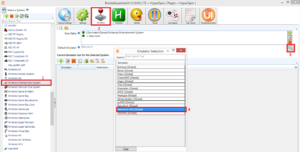
- Now if you want to immediately use your custom module, follow these steps to make it your default emulator for your system:
- Select the system you want to change
- Select Emulators tab
- Click the magnifying glass to popup the Emulator Selection window
- Select your new custom module
- If for some reason your module is not shown, try going to the Modules tab and clicking the refresh button
 and try again
- Enjoy your new custom module!
Remap Existing Emulator For Your Module
If you decide to go the route of simply remapping the existing emulator to your custom module, follow these instructions:
- Your only step is to edit the existing module and point it to your new module. First, you need to assign an emulator to your module, so for most scenarios you will want to make a global emulator. Select the Global System and Emulators Tab:
- Now find the emulator that matches your module and double click it and change the Module setting to the path of your custom module:
- Now any system that already had this emulator assigned to it, will now be using your new custom module!
Creating Your Own Functions
- You can add your own functions and code to affect every module
- You have 2 functions in your \Lib folder called User Functions Init.ahk and User Functions.ahk
Lib\User Functions\Global.ahk
InitUserFeatures()
; Use this function to define any code you want to run on initialization
	InitUserFeatures() {
		Global RLLog,dbName,systemName
		RLLog.Info(A_ThisFunc . " - Starting")
		; PASTE YOUR User Functions Init.ahk HERE
		RLLog.Info(A_ThisFunc . " - Ending")
	}
- This should contain any code you want to "Run" with the modules. This is where you place code you might need to setup or initialize something you want to run later. Take a look at and of the other Init ahks to see how these files are used.
- DO NOT place any Functions or Labels in this file, it will lock up the thread and give the appearance it froze when it's actually stuck in your function not knowing what to do.
- This file will "Run" before StartModule() found in each module. For example, if you place this script in this file: "MsgBox test", it will show a msgbox on launch of every emulator.
- So you can see why it's important you place only script you feel is required for every module.
StartUserFeatures()
	; Use this function to define any code you want to run in every module on start
	StartUserFeatures() {
		Global RLLog,dbName,systemName
		RLLog.Info(A_ThisFunc . " - Starting")
		; INSERT CODE HERE
		RLLog.Info(A_ThisFunc . " - Ending")
	}
- Place any ahk code in the space provided and it will be launched at the beginning of every module, before the emulator runs.
- This should contain any Functions and Labels that are called within the module itself. Take a look at and of the other non-Init ahks to see how these files are used.
- If you create a function that looks like this:
MyFunc(text){
  MsgBox % text
}
- Then in the module place this line anywhere you want: "MyFunc("Hello World")", it will show you the msgbox at that specific spot.
StopUserFeatures()
	; Use this function to define any code you may need to stop or clean up in every module on exit
	StopUserFeatures() {
		Global RLLog,dbName,systemName
		RLLog.Info(A_ThisFunc . " - Starting")
		; INSERT CODE HERE
		RLLog.Info(A_ThisFunc . " - Ending")
	}
- Place any ahk code in the space provided and it will be launched at the end of every module, after the emulator is closed, but before the module thread exits.
StartPauseUserFeatures()
- This function has already been created for you in Lib\User Functions.ahk.
- Place any ahk code in the space provided and it will be launched when Pause is activated.
StopPauseUserFeatures()
- This function has already been created for you in Lib\User Functions.ahk.
- Place any ahk code in the space provided and it will be launched Pause is exited.
Don't Repeat Yourself
- A very good rule of thumb to follow is something called DRY: http://en.wikipedia.org/wiki/Don't_repeat_yourself
- When you create your own code, and you need to go back and change something, if you did not follow the above principles, you might not remember to change all instances of something.
RocketLauncher.dll
This dll provides some critical functions to get many of the features working. To utilize it, we have to first create a com object, then pass that along with what we want the dll to do.
First include these libraries in your script:
#Include, CLR.ahk
#Include, COM.ahk
Create the object:
DLLLibrary := CLR_LoadLibrary("PATH_TO_DLL")
TestObject := CLR_CreateObject(DLLLibrary,"RLUtil.RocketLauncherUtils")
Now you can use the object to start calling functions from the DLL.
The following functions are supported by the DLL. For an up-to-date listing, always check Lib\RL.ahk
checkModuleCRC
- Purpose: Provides a method to calculate the CRC of a module, extension, and library, which RocketLauncher uses to determine if these files are official or not.
- Usage:
- Module CRC Checking:
Result := COM_Invoke(TestObject, "checkModuleCRC", "PATH_TO_MODULE_AHK_FILE","",1)
- Ahk Library CRC Checking (CLR,Gdip,etc.):
Result := COM_Invoke(TestObject, "checkModuleCRC", "PATH_TO_AHK_FILE","CRC_VALUE",0)
- RocketLauncher Extensions (Pause,FadeAnimations,etc.):
Result := COM_Invoke(TestObject, "checkModuleCRC", "PATH_TO_AHK_FILE","",0)
set7zdllPath
- Purpose:Provides a way to change the path to the 7z.dll. By default it will use the 7z.dll file that's in the same folder as the dll.
- Usage:
Result := COM_Invoke(TestObject, "set7zdllPath", "PATH_TO_7Z.DLL_FILE)
findFileInZip
- Purpose: Provides a method to find a specific file inside a supported archive. Returns empty string if no matches are found. FILENAMES_TO_SEARCH and EXTENSIONS_TO_SEARCH support multiple entries, separator is the | character,
- Example: filename1|filename2|filename3 or ext1|ext2|ext3. File Extensions are WITHOUT the dot character.
- Usage:
Result := COM_Invoke(TestObject, "findFileInZip", "PATH_TO_FILE","FILENAMES_TO_SEARCH","EXTENSIONS_TO_SEARCH")
findByExtension
- Purpose: Returns the first found file inside a supported archive when only supplying an extension. Returns empty string if no matches are found. EXTENSIONS_TO_SEARCH support multiple entries, separator is the | character, example: ext1|ext2|ext3. File Extensions are WITHOUT the dot character.
- Usage:
Result := COM_Invoke(TestObject,"findByExtension","PATH_TO_FILE","EXTENSIONS_TO_SEARCH")
getZipExtractedSize
- Purpose: Returns the uncompressed size, or size on disk, of all files an archive will use when extracted.
- Usage:
Result := COM_Invoke(TestObject, "getZipExtractedSize", "PATH_TO_FILE")
getExtractionSize
- Purpose: Returns a | separated string of the current file being extracted and current size on disk. Used as a method to determine extraction progress. search_mode can be 0 (Accurate) or 1 (Fast). Only use the Fast Method when you are expecting a folder with hundreds of small files inside it otherwise always use the accurate one.
- Usage:
Result := COM_Invoke(TestObject, "getExtractionSize", "PATH_TO_FILE", search_mode)
getExtractionProgress
- Purpose: Returns a | separated string of the current file being extracted and a percentage for the global extraction. total_size is the uncompressed size, or size on disk, of the archive, you can get that value using the getZipExtractedSize function. Used as a method to determine extraction progress. search_mode can be 0 (Accurate) or 1 (Fast). Only use the Fast Method when you are expecting a folder with hundreds of small files inside it otherwise always use the accurate one.
- Usage:
Result := COM_Invoke(TestObject, "getExtractionProgress", "PATH_TO_FILE", total_size, search_mode)
getFolderSize
- Purpose: Returns the size of the specified folder and all it's contents including sub-folders. search_mode can be 0 (Accurate) or 1 (Fast). Only use the Fast Method when you are expecting a folder with hundreds of small files inside it otherwise always use the accurate one.
- Usage:
Result := COM_Invoke(TestObject, "getFolderSize", "PATH_TO_FILE", search_mode)
getLongestPathSize
- Purpose: Returns the length of the path for deepest file inside the archive. This can be used to check if extracting an archive won't break the 255 character limit that exists in Windows.
- Usage:
Result := COM_Invoke(TestObject, "getLongestPathSize", "PATH_TO_FILE")
getZipFileList
- Purpose: Returns a | separated string of all files inside a supported archive. Also returns the compression method for each file. Output format is "filename 1|compression type/filename 2|compression type/..." This can be useful for example to debug situations while the progress bar stays at 0% for a while due to the compression method used.
- Usage:
Result := COM_Invoke(TestObject, "getZipFileList", "PATH_TO_FILE")
getZipFileCount
- Purpose: Returns the number of files inside the archive.
- Usage:
Result := COM_Invoke(TestObject, "getZipFileCount", "PATH_TO_FILE")
checkInvalidCharacters
- Purpose: Check if compressed files contain illegal filename characters which wouldn't allow it to be uncompressed under Windows (need this for WinUAE as some invalid Windows characters are actually valid AmigaDOS filenames). Returns 1 - Has invalid chars; 0 - No invalid chars.
- Usage:
Result := COM_Invoke(TestObject, "checkInvalidCharacters", "PATH_TO_FILE")
getConnectedJoysticks
- Purpose: Returns a binary string with 16 characters representing the 16 possible joystick ports windows supports. Example 1100000000000000. A 1 represents a joystick is in that port, 0 means no joystick. You read the binary from left to right with left most number being port 0 and right most port being port 15 (16 ports in total).
- Usage:
Result := COM_Invoke(TestObject, "getConnectedJoysticks")
getPdfPageCount
- Purpose: Returns the number of pages of a PDF file.
- Usage:
Result := COM_Invoke(TestObject, "getPdfPageCount", "PATH_TO_PDF_FILE")
generatePngFromPdf
- Purpose: Converts a PDF file to several PNG files (one per page). firstPage and lastPage are optional and if not provided it will convert the whole PDF file. PNG files will be generated to OUTPUT_FOLDER and will be named pageX.png where X is the page number.
- Usage:
Result := COM_Invoke(TestObject, "generatePngFromPdf", "PATH_TO_PDF_FILE", "OUTPUT_FOLDER", dpiResolution, [firstPage], [lastPage])
setLogMode
- Purpose: Activates logging in the DLL. logMode can be 0 - Log disabled; 1 - Log to file; 2 - Log to memory. When logging to file the output will be directed to RocketLauncher.dll.log that resides in the same folder as the RocketLauncher.dll file.
- Usage:
Result := COM_Invoke(TestObject, "setLogMode", logMode)
