Difference between revisions of "Keymapper"
Kevinlives (talk | contribs) |
Kevinlives (talk | contribs) |
||
| Line 32: | Line 32: | ||
Xpadder costs $10 and can be downloaded from [http://xpadder.com/ xpadder.com]. This is the recommended keymapper of choice. To set it up, run it once you have downloaded it. Make note of where you have installed it to since you will need to know that when you use it with HyperLaunch. Once you have installed it, you will need to make a layout for your controller. | Xpadder costs $10 and can be downloaded from [http://xpadder.com/ xpadder.com]. This is the recommended keymapper of choice. To set it up, run it once you have downloaded it. Make note of where you have installed it to since you will need to know that when you use it with HyperLaunch. Once you have installed it, you will need to make a layout for your controller. | ||
<br /> | <br /> | ||
| − | [[File: | + | <br /> |
| + | [[File:Make a controller layout2.JPG]]<br /> | ||
| + | <br /> | ||
| + | Images to replace the pink background can be found at [http://xpadder.com/gcdb.php xpadder.com/gcdb]. An image of your controller will be useful for making your profiles. To grab an image from the xpadder database right click on the image you want and choose copy image. You can then use the paste button in xpadder. Now you will need to add your analog sticks, dpad, buttons and triggers using the on screen instructions Once you've finished adding all the controls for your controller you will need to save your layout. I suggest saving it as the same name as your controller (the default name).<br /> | ||
| + | <br /> | ||
| + | [[File:Make a controller layout3.JPG]]<br /> | ||
| + | <br /> | ||
| + | You will now need to create a profile. Profiles are what HyperLaunch uses to tell xpadder how to map your controller. You can start by making a profile by clicking on the text page button first and then choosing New. | ||
| + | <br /> | ||
| + | <br /> | ||
| + | [[File:xpadder profile creation.JPG]]<br /> | ||
| + | <br /> | ||
| + | The next step is to map your buttons to a keyboard key. This is simple and easy to do. You will need to click on one of the white boxes that represent your buttons on your controller. This will open a virtual keyboard. Choose your key. When you are finished mapping your buttons you can now save your profile. To use with HyperLaunch you will need to name it and place it in the correct folder path as described in the [https://sites.google.com/ profiles] section below. | ||
Revision as of 16:15, 7 April 2015
ONLY Xpadder (2012 versions) and JoyToKey (v5+) and Autohotkey scripts are supported options for keymapper functionality. Will not work with JoyToKey v3 or below.
Even though Keymapper supports 16 controllers, this only for Direct Input and not XInput since XInput is limited to 4 controllers. (Xinput is typically used in software that natively supports the 360 controller.)
| Contents
3 Preferred Controller |
Keymappers:
Xpadder:
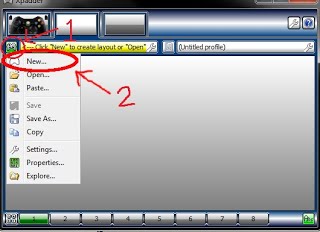
Xpadder costs $10 and can be downloaded from xpadder.com. This is the recommended keymapper of choice. To set it up, run it once you have downloaded it. Make note of where you have installed it to since you will need to know that when you use it with HyperLaunch. Once you have installed it, you will need to make a layout for your controller.
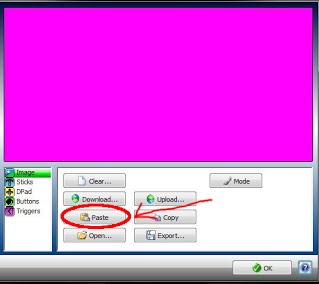
Images to replace the pink background can be found at xpadder.com/gcdb. An image of your controller will be useful for making your profiles. To grab an image from the xpadder database right click on the image you want and choose copy image. You can then use the paste button in xpadder. Now you will need to add your analog sticks, dpad, buttons and triggers using the on screen instructions Once you've finished adding all the controls for your controller you will need to save your layout. I suggest saving it as the same name as your controller (the default name).
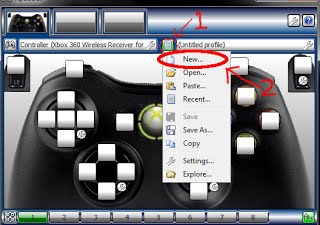
You will now need to create a profile. Profiles are what HyperLaunch uses to tell xpadder how to map your controller. You can start by making a profile by clicking on the text page button first and then choosing New.
The next step is to map your buttons to a keyboard key. This is simple and easy to do. You will need to click on one of the white boxes that represent your buttons on your controller. This will open a virtual keyboard. Choose your key. When you are finished mapping your buttons you can now save your profile. To use with HyperLaunch you will need to name it and place it in the correct folder path as described in the profiles section below.


